Fornitori di autenticazione esterni
È possibile definire più provider di autenticazione esterni utilizzando le sezioni [provider.x]:
[provider.1]
type = oidc
                            # Provider type, currently only oidc is available
name = OIDC Example
                            # Display name
issuer = example
                            # issuer of the tokens. Can be "google", "microsoft"
                            # or an arbitrary string for custom identity
                            # providers
icon = url('data:image/svg+xml;base64,...')
                            # Optional display icon. Can be either a remote or
                            # a data URL. If omitted, a default icon is used
                            # based on type and provider.
metadata_url = https://example.com/auth/realms/<realm>
                            # URL to get OIDC metadata from. Can be obtained
                            # from the provider.
                            # It usually contains a realm or tenant id.
client_id = <client-id>
                            # OIDC client secret. Can be obtained from the
                            # provider. Some providers call this "app id".
client_secret = <client-secret->
                            # OIDC client secret. Can be obtained from the
                            # provider. Some providers call this "secret value".
hidden = false
                            # it is possible to hide an authentication provider
                            # on the SKOOR Auth start page. This can be useful
                            # if e.g. normal users authenticate against a public
                            # provider and support employees against an internal
                            # one.
Microsoft Azure AD OpenID Connect
Inserimento del fornitore di autenticazione SKOOR Auth
[provider.1]
type = oidc
name = Azure AD Example
issuer = microsoft
metadata_url = https://login.microsoftonline.com/<tenant-id>/v2.0
client_id = <app-id>
client_secret = <secret-value>
L'icona viene impostata automaticamente in base al nome dell'emittente.
Impostazioni necessarie in Azure AD
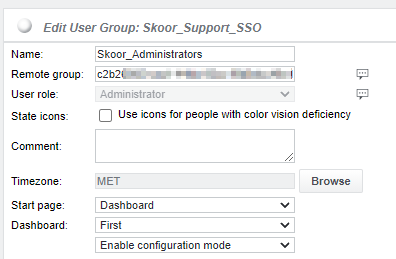
L'ID del gruppo Azure deve corrispondere al gruppo remoto SKOOR:
Per consentire agli utenti di accedere e ottenere l'assegnazione del ruolo corretto, è necessario configurare questi ID.
Nell'esempio seguente, tutti gli utenti del gruppo Azure AD con l'ID c2b2***** avranno il ruolo di amministratore dopo l'accesso:
Registrazione dell'app
Nella vostra Azure Active Directory registrate una nuova applicazione, scegliete i tipi di account supportati in base alla vostra configurazione AD (Single- o Multi- tenant).
Come URI di reindirizzamento configurate quanto segue, a seconda dei servizi attivati dal vostro server. Questo può essere modificato anche in seguito.
SKOOR Engine / SKOOR Dashboard | https://<FQDN>/skoor-auth/oidc/code |
SKOOR Dashboard Viewer | https://FQDN/skoor-dashboard-viewer-auth/oidc/code |
ID inquilino e ID cliente
Una volta salvata la registrazione dell'applicazione, aprire la scheda panoramica dell'applicazione creata e prendere nota dei due ID che saranno successivamente necessari per la configurazione. Questi sono chiamati:
ID applicazione (client)
ID directory (tenant)
Certificati e segreti
Passare quindi a Certificati e segreti e aggiungere un segreto del client. Impostare un nome per questo segreto e scegliere una data di scadenza. Una volta salvato, è possibile vedere l'id del segreto e il valore del segreto. Il valore del segreto è necessario per configurare il servizio SKOOR Auth.
Token
Andare alla configurazione del token e selezionare "add groups claim". Nella configurazione della richiesta, selezionare "Gruppi di sicurezza" e selezionare la proprietà del token Tipo 'ID' su 'sAMAccountName'.
Autorizzazione API
Questo passaggio è facoltativo. Per abilitare ulteriori dettagli sulla configurazione dell'utente in Skoor, ad esempio la foto del profilo, l'applicazione deve avere il permesso di leggere il profilo completo dell'utente.
Pertanto, è possibile eseguire i seguenti passaggi nella scheda 'Permessi API':
Aggiungi autorizzazione
Selezionare Microsoft Graph
Autorizzazioni delegate
Cercare User.Read o scorrere la sezione 'user' e selezionare 'User.Read', quindi fare clic su 'add permission'.
Nella panoramica, confermare l'autorizzazione selezionando "Concedi il consenso dell'amministratore".
Keycloak
Inserimento del fornitore di autorizzazioni SKOOR Auth
[provider.2]
type = oidc
name = SKOOR Keycloak
issuer = skoor
icon = url('data:image/svg+xml;base64,PD94bWwgdmVyc2lvbj0iMS4wIiBlbmNvZGluZz0iVVRGLTgiIHN0YW5kYWxvbmU9Im5vIj8+CjxzdmcKICAgeG1sbnM6ZGM9Imh0dHA6Ly9wdXJsLm9yZy9kYy9lbGVtZW50cy8xLjEvIgogICB4bWxuczpjYz0iaHR0cDovL2NyZWF0aXZlY29tbW9ucy5vcmcvbnMjIgogICB4bWxuczpyZGY9Imh0dHA6Ly93d3cudzMub3JnLzE5OTkvMDIvMjItcmRmLXN5bnRheC1ucyMiCiAgIHhtbG5zOnN2Zz0iaHR0cDovL3d3dy53My5vcmcvMjAwMC9zdmciCiAgIHhtbG5zPSJodHRwOi8vd3d3LnczLm9yZy8yMDAwL3N2ZyIKICAgeG1sbnM6c29kaXBvZGk9Imh0dHA6Ly9zb2RpcG9kaS5zb3VyY2Vmb3JnZS5uZXQvRFREL3NvZGlwb2RpLTAuZHRkIgogICB4bWxuczppbmtzY2FwZT0iaHR0cDovL3d3dy5pbmtzY2FwZS5vcmcvbmFtZXNwYWNlcy9pbmtzY2FwZSIKICAgdmlld0JveD0iMCAwIDI1LjAwMDAwMSAyNSIKICAgaGVpZ2h0PSIyNSIKICAgd2lkdGg9IjI1IgogICB4bWw6c3BhY2U9InByZXNlcnZlIgogICBpZD0ic3ZnMiIKICAgdmVyc2lvbj0iMS4xIgogICBzb2RpcG9kaTpkb2NuYW1lPSJza29vci1jaXJjbGUuc3ZnIgogICBpbmtzY2FwZTp2ZXJzaW9uPSIwLjkyLjUgKDIwNjBlYzFmOWYsIDIwMjAtMDQtMDgpIj48c29kaXBvZGk6bmFtZWR2aWV3CiAgICAgcGFnZWNvbG9yPSIjZmZmZmZmIgogICAgIGJvcmRlcmNvbG9yPSIjNjY2NjY2IgogICAgIGJvcmRlcm9wYWNpdHk9IjEiCiAgICAgb2JqZWN0dG9sZXJhbmNlPSIxMCIKICAgICBncmlkdG9sZXJhbmNlPSIxMCIKICAgICBndWlkZXRvbGVyYW5jZT0iMTAiCiAgICAgaW5rc2NhcGU6cGFnZW9wYWNpdHk9IjAiCiAgICAgaW5rc2NhcGU6cGFnZXNoYWRvdz0iMiIKICAgICBpbmtzY2FwZTp3aW5kb3ctd2lkdGg9IjE5MjAiCiAgICAgaW5rc2NhcGU6d2luZG93LWhlaWdodD0iMTAxNiIKICAgICBpZD0ibmFtZWR2aWV3MTMiCiAgICAgc2hvd2dyaWQ9ImZhbHNlIgogICAgIGlua3NjYXBlOnpvb209IjIyLjIyNjk2NyIKICAgICBpbmtzY2FwZTpjeD0iOC4yODU2MDM4IgogICAgIGlua3NjYXBlOmN5PSIxMy42MjkyMjYiCiAgICAgaW5rc2NhcGU6d2luZG93LXg9IjAiCiAgICAgaW5rc2NhcGU6d2luZG93LXk9IjI3IgogICAgIGlua3NjYXBlOndpbmRvdy1tYXhpbWl6ZWQ9IjEiCiAgICAgaW5rc2NhcGU6Y3VycmVudC1sYXllcj0ic3ZnMiIKICAgICBmaXQtbWFyZ2luLXRvcD0iMCIKICAgICBmaXQtbWFyZ2luLWxlZnQ9IjAiCiAgICAgZml0LW1hcmdpbi1yaWdodD0iMCIKICAgICBmaXQtbWFyZ2luLWJvdHRvbT0iMCIgLz48bWV0YWRhdGEKICAgICBpZD0ibWV0YWRhdGE4Ij48cmRmOlJERj48Y2M6V29yawogICAgICAgICByZGY6YWJvdXQ9IiI+PGRjOmZvcm1hdD5pbWFnZS9zdmcreG1sPC9kYzpmb3JtYXQ+PGRjOnR5cGUKICAgICAgICAgICByZGY6cmVzb3VyY2U9Imh0dHA6Ly9wdXJsLm9yZy9kYy9kY21pdHlwZS9TdGlsbEltYWdlIiAvPjxkYzp0aXRsZT48L2RjOnRpdGxlPjwvY2M6V29yaz48L3JkZjpSREY+PC9tZXRhZGF0YT48ZGVmcwogICAgIGlkPSJkZWZzNiIgLz48cGF0aAogICAgIGlkPSJwYXRoMjQiCiAgICAgc3R5bGU9ImZpbGw6I2UyMDA3YTtmaWxsLW9wYWNpdHk6MTtmaWxsLXJ1bGU6bm9uemVybztzdHJva2U6bm9uZTtzdHJva2Utd2lkdGg6MC4wMjg2ODc3NSIKICAgICBkPSJtIDYuMDkzODUyMiwxMi4xNzc1MjUgYyAwLDMuODgzNDYgMi44Njc5MTM1LDYuNzIwOTY2IDYuMzYyMzY2OCw2LjcyMDk2NiAzLjQ5NTAyOSwwIDYuMzYyOTQ1LC0yLjgzNzUwNiA2LjM2Mjk0NSwtNi43MjA5NjYgMCwtMy4xMDYyOTU2IC0yLjg2NzkxNiwtNS45NDM4MDA1IC02LjM2Mjk0NSwtNS45NDM4MDA1IC0zLjQ5NDQ1MzMsMCAtNi4zNjIzNjY4LDIuODM3NTA0OSAtNi4zNjIzNjY4LDUuOTQzODAwNSB6IE0gMjQuOTEyNDQxLDEyLjE0Nzk4IGMgMCw3LjI4ODY5NiAtNS4yMjcxOTUsMTIuNDI2NjcyIC0xMi40NTYyMjIsMTIuNDI2NjcyIEMgNS4yMjc0ODE1LDI0LjU3NDY0OSAwLDE5LjQzNjY3MiAwLDEyLjE0Nzk3NyAwLDUuMzM3NTE5MyA1Ljk3NDIyNDMsMC41NTc4NTM0NSAxMi40NTYyMTksMC41NTc4NTM0NSBjIDYuNDgyMjg0LDAgMTIuNDU2MjIyLDQuNzc5NjY1ODUgMTIuNDU2MjIyLDExLjU5MDEyMzU1IgogICAgIGlua3NjYXBlOmNvbm5lY3Rvci1jdXJ2YXR1cmU9IjAiIC8+PC9zdmc+')
metadata_url = https://<keycloak-server-address>/auth/realms/<realm>
client_id = <client-id>
client_secret = <client-secret>
Poiché abbiamo un emittente personalizzato, dobbiamo fornire un'icona da visualizzare accanto al nome. Possiamo fornire l'icona utilizzando un URL di dati.
Impostazioni necessarie in Keycloak
Quella che segue è una configurazione minima per far funzionare un OIDC con Keycloak. Può essere utilizzata se non si dispone di un provider di autenticazione compatibile con OIDC e si desidera autenticare gli utenti rispetto a una directory attiva interna.
Impostazioni del reame
Se non avete già un reame configurato, dovete aggiungerne uno. Un buon nome del reame potrebbe essere il nome della propria azienda. Questo nome è il valore da inserire come <realm> nella voce del provider.
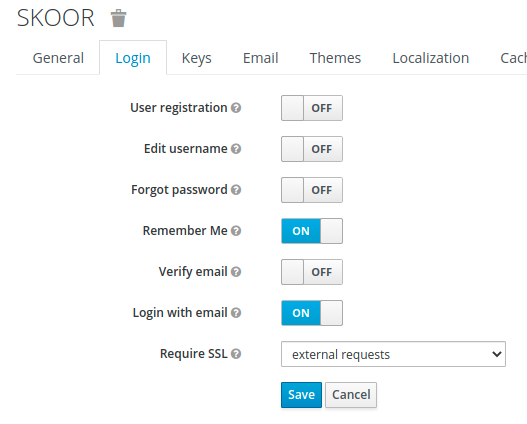
Potrebbe essere una buona idea attivare l'opzione Ricordami nella scheda Login.
Clienti
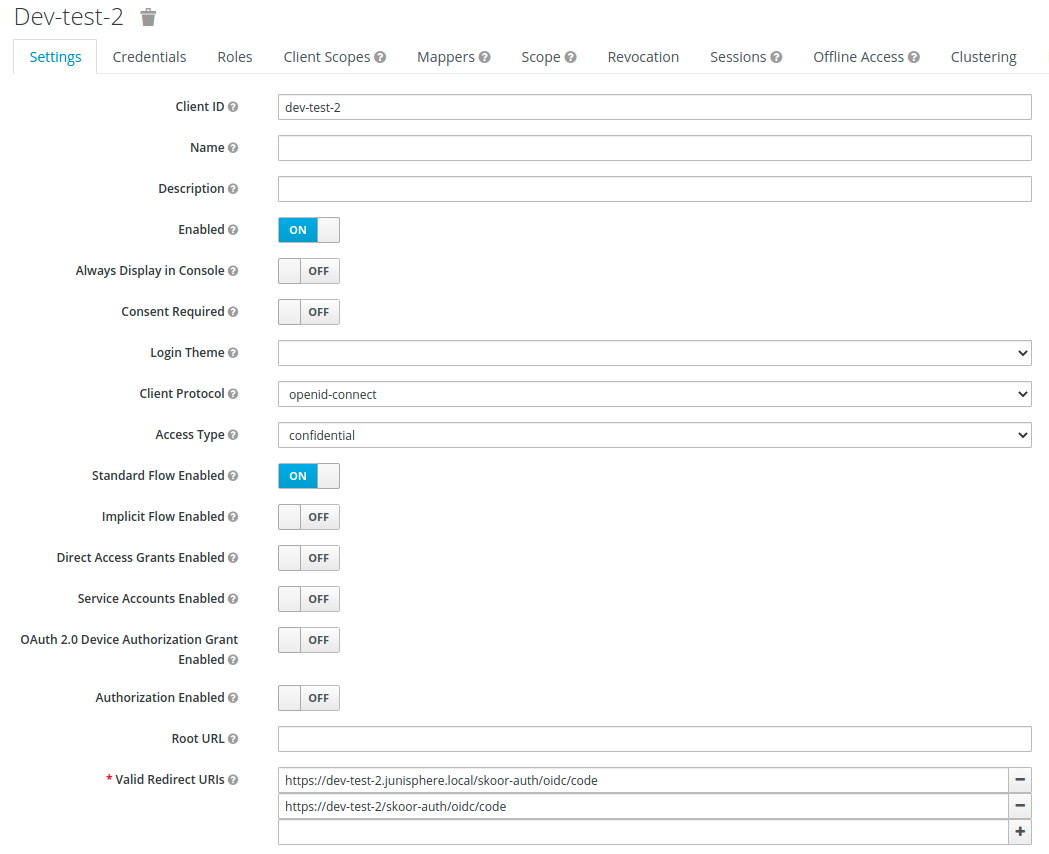
È necessario aggiungere una configurazione client per SKOOR.
L'ID del client deve essere inserito come <client_id> nella configurazione del provider.
Ilprotocollo del client deve essere openid-connect.
Iltipo di accesso deve essere riservato.
Ilflusso standard deve essere abilitato.
Gli URL di reindirizzamento devono essere impostati sui seguenti valori:
SKOOR Engine / SKOOR Dashboard | https://<FQDN>/skoor-auth/oidc/code |
SKOOR Dashboard Viewer |
Il segreto del client necessario per la configurazione del provider <client_secret> può essere ottenuto dalla scheda Credenziali.
Scopi del client
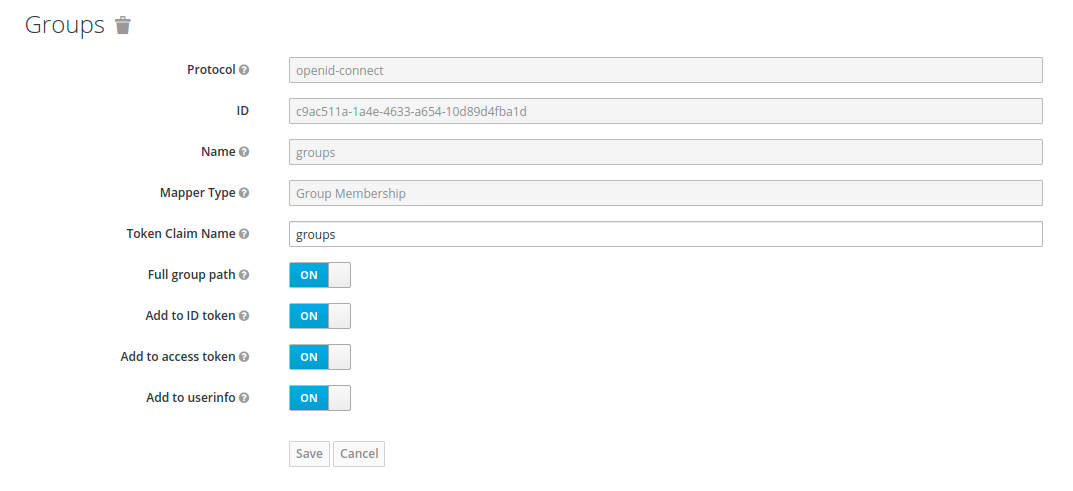
Per ottenere le informazioni sui gruppi per un utente, è necessario aggiungere all'ambito del profilo un mapper aggiuntivo chiamato gruppi.
Federazione degli utenti
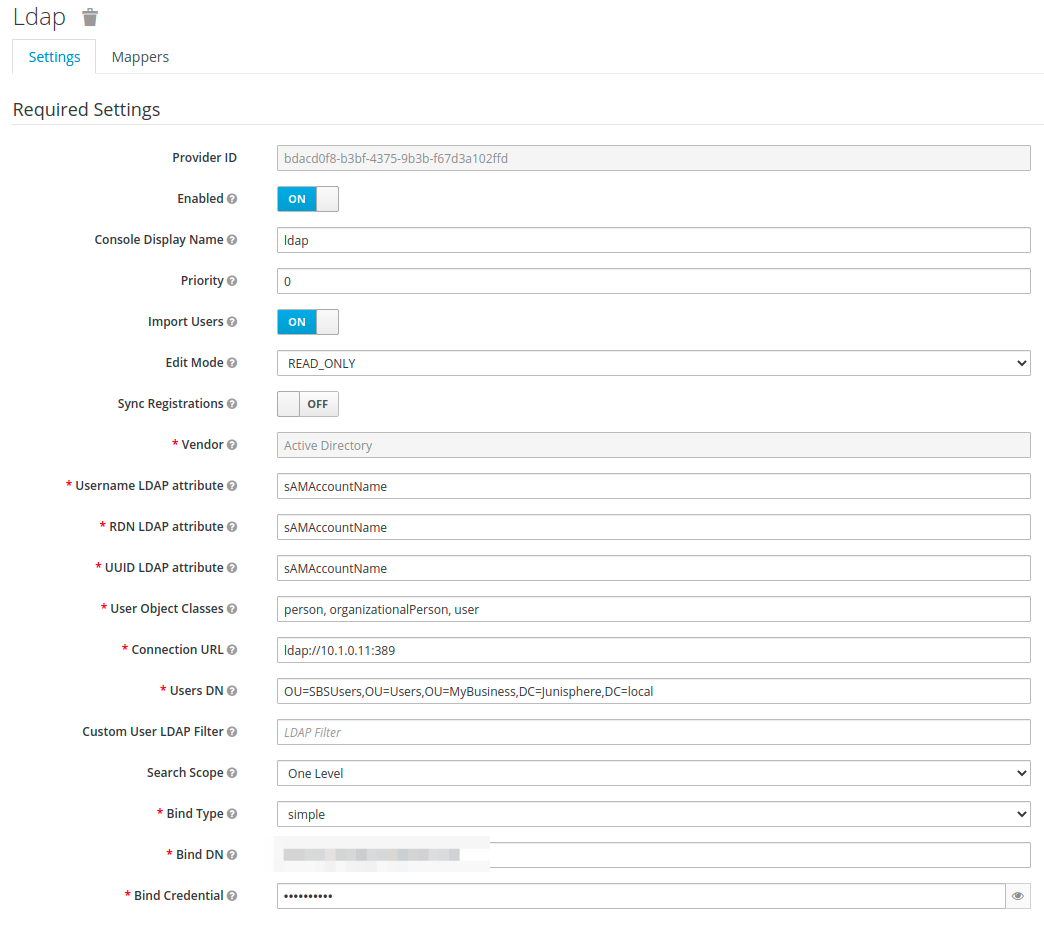
Per poter effettuare l'autenticazione contro una directory attiva, è necessario aggiungere un provider LDAP.
Questa impostazione dipende molto dalla configurazione di AD
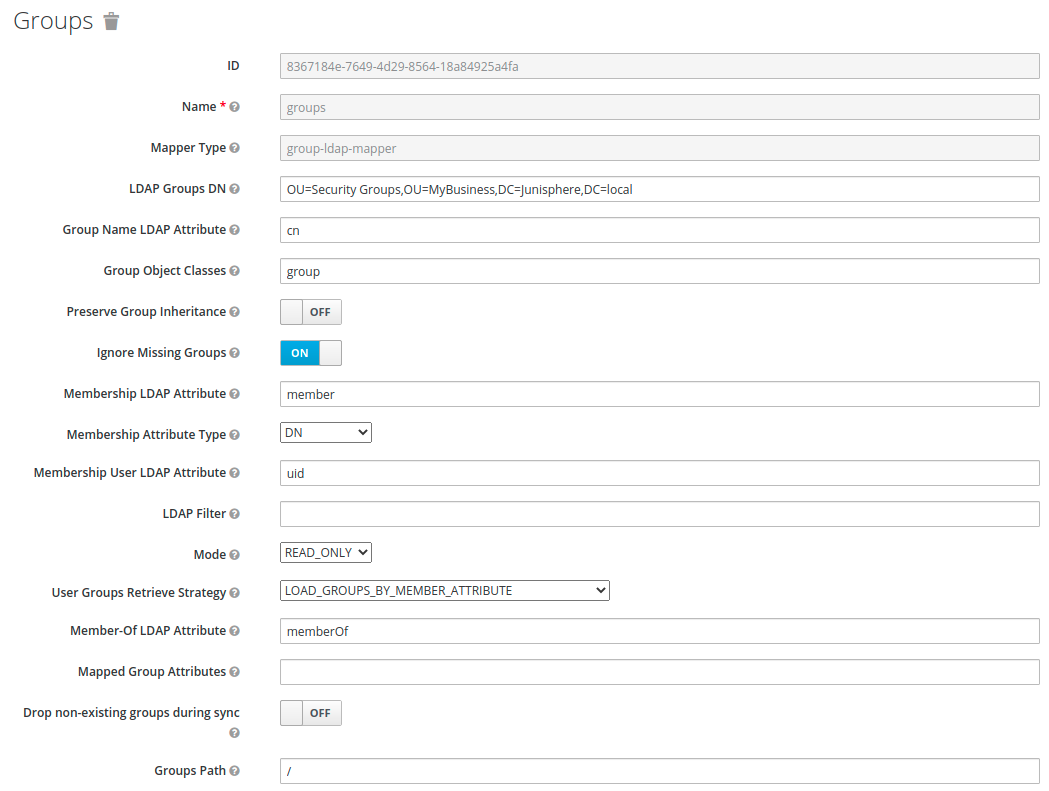
Un passo molto importante è aggiungere un mapper di tipo group-ldap-mapper.
Kerberos
Se è necessario Kerberos SSO, questo può essere attivato nel menu Autenticazione.
