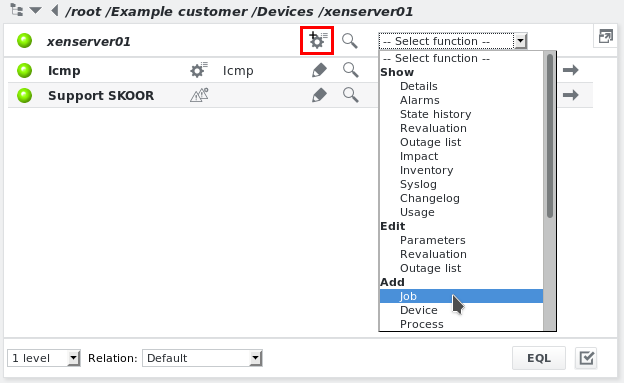
Add job
Select Add job from the dropdown menu on any device or click the Add job icon next to its name:
Job - Common parameters
In the Add new job under window, enter a name and select the type of job (in this case Icmp). Also an alarm parent can be defined.
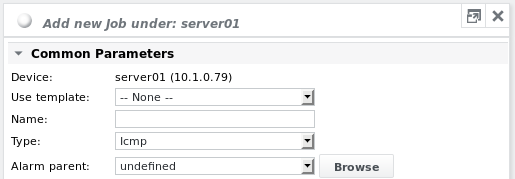
Device
Read-only field showing the name and address of the device
Use template
If a job template has been defined (see chapter Templates), it can be chosen from the dropdown list.
Name
Enter any name. Job names don’t have to be unique, since the device name is always attached for alarming, reporting etc.. If this field is left empty, the name will be the same as the job’s type.
Type
A detailed description of each job type is available in chapter Plugins (jobs)
Alarm parent
The Alarm parent function is used to suppress alarm spamming (see section Alarm parent)
Job - Job execution
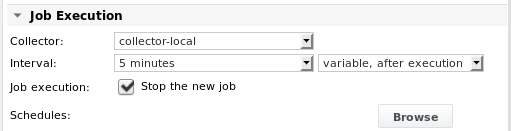
Collector
Select the collector on which the job should be executed
Interval
Interval
Select a pre-defined job execution interval or use User defined, as in the example below. It’s also possible to use only h, m or s, e.g. 7min.

If a job must not be executed at all or only through a parent batch job, select No repetition for the Interval parameter.
Job interval mode
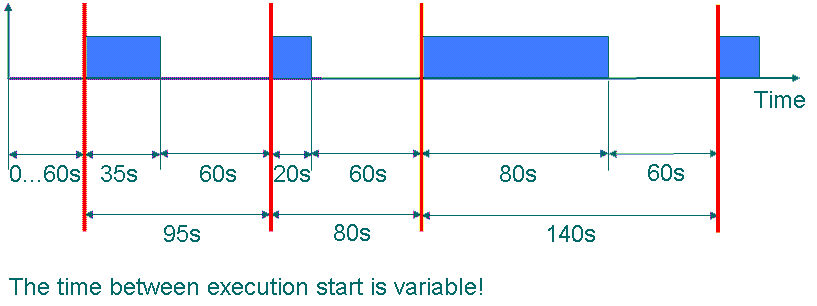
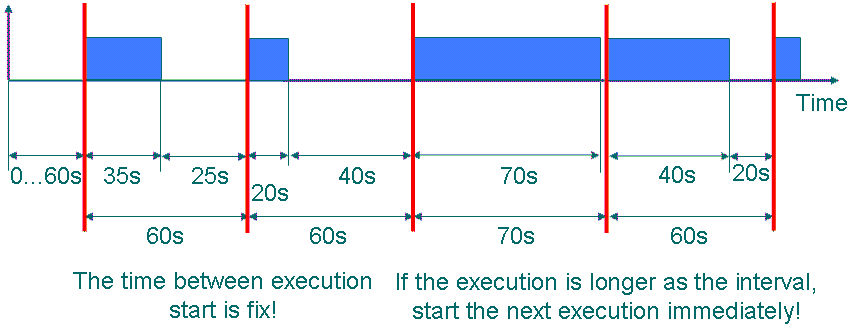
There are three interval modes to choose from. Consider the following example for an execution interval of 60s.
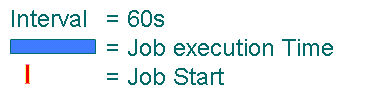
Variable, after execution
Fix, if longer immediately
Fix, if longer ignore next

Inotify (file change)
Execute- and Parsefile jobs can use a special interval method called inotify. The job will be triggered once a specified file is written or updated.
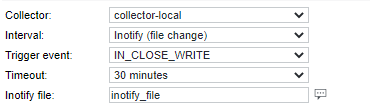
there are two options available to trigger the execution:
IN_MODIFY: for files that are opened once like log files
IN_CLOSE_WRITE: for files that are modified and closed
Timeout can be configured to trigger an error in case the watched file gets no update.
Job execution
Activate the Stop the new job checkbox to create the job as a stopped job. If it is not active the job may start its execution right away after job creation, depending on the configured execution interval. If the job configuration is not yet finished when creating the job, this might lead to false alarms, if this job or its parent device are linked to an alarm object. A stopped job can be started by clicking the Start button in the job's Show details view.
Schedules
Schedules can be linked to a job to define the time periods during which the job should be executed. The job is only executed according to its execution interval if the current time is within the active time defined in the schedule. See section Schedule and exception schedule for details on how to configure schedules. The schedule must already exist before it can be attached to a job.
Job - Properties
The following predefined properties can be added to the job’s configuration:
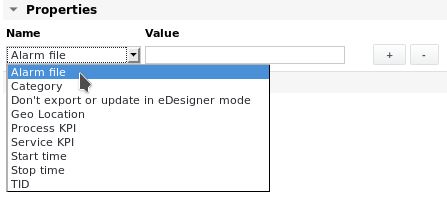
Alarm file
Supported by jobs of type Execute, Parsefile, HTTP and EEM only
Enter the path and name of the alarm file (on the collector), which can be submitted, if this job creates an alarm:
If the job is of type Parsefile or Execute, only textfiles are processed
The alam file must be accessible by the user eranger on the collector that executes the job
The file will be transferred to the server at execution time of the job, regardless of the its state
Category
choose one of the following job categories:
Availability
Capacity
Incidents
Performance
QoS
Security
Don’t export or update in eDesigner mode
For internal purposes only.
Geo location
Geographical coordinates of the object for display in a Geo Map (latitude/longitude), separated by comma, slash, semicolon or space. Example coordinates: 47.4612,8.3021
Process KPI
To enable the measurement in the KPI Widgets
Service KPI
To enable the measurement in the KPI Widgets
Start time
Enter a date/time in format DD.MM.YYYY HH:MM when job should be started
Manually starting a job takes precedence over this setting
Date/time must be before date/time configured in Stop time property
Stop time
Enter a date/time in format DD.MM.YYYY HH:MM when job should be stopped
Manually stopping a job takes precedence over this setting
TID
3rd party identification - a unique identification for a 3rd party system, e.g. a CMDB or an asset database. Once set, this attribute cannot be changed.
Job - Permissions
Define permissions according to chapter Permissions.
Job - config page 2
After configuring the job's common parameters, proceed to configuration page 2 by pressing the Next button.
For job-specific parameters, refer to the individual job plugins in chapter Plugins (jobs).