 Documentation
Custom Widgets
Custom widgets will be available starting with SKOOR 10.0.0.
Custom Widgets extend the SKOOR visualization ecosystem by allowing developers to build tailored, interactive UI components that run securely within SKOOR dashboards. They combine the flexibility of modern web frameworks (such as React or Vue, or plain Vanilla JS) with modern build tools (such as Vite or Webpack), alongside SKOOR's governed data pipelines and strict security standards.
Quick Start Guide
To use custom widgets, you'll need SKOOR Registry credentials. Contact support@skoor.com to request them.
Use the @skoor/create-custom-widget package to scaffold a fresh SKOOR custom widget project with the recommended structure and dependencies.
Open the package page: https://www.npmjs.com/package/@skoor/create-custom-widget
Scaffold a widget project: Follow the package instructions to create a new custom widget workspace.
Build, test, and publish: Implement the widget, validate it locally, then publish it to the SKOOR Package Registry under the assigned customer scope.
How Custom Widgets Work
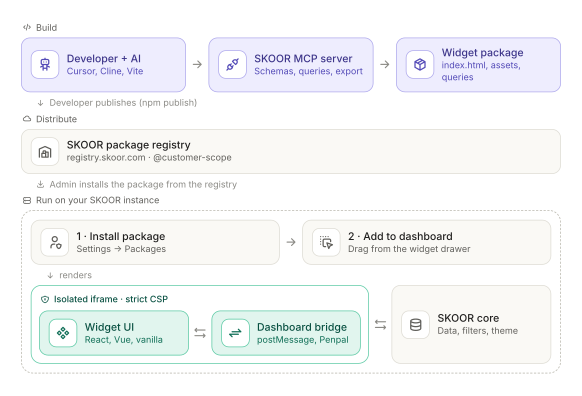
Custom widgets operate as isolated, self-contained packages distributed and managed through the centralized SKOOR Package Registry (registry.skoor.com).
Entry Point (
main): Each widget package defines an HTML file as itsmainentry point inpackage.json. All required static assets (scripts, styles, images) are loaded directly from the registry.Isolated Execution: Widgets execute inside IFRAMEs that are isolated through a dedicated origin and a restrictive Content Security Policy (CSP). This ensures tenant separation, security, and strict boundary controls.
Creation Methods: Custom widgets can be authored either manually by engineers using any modern local development workflow (for example Vite, Webpack, or Vanilla JS) or generated via AI to quickly scaffold functional dashboards and components.
Package Structure & Data Queries
To remain fully portable and version-controlled, custom widgets bundle their required data definitions directly within the package under the skoor configuration block:
Bundled Queries: Packages include their required database queries under the
skoor.dataQueryPackageproperty, pointing to an exported query JSON file. Use the SKOOR MCP server export tool to export a dedicated query group; the export automatically includes the required dependencies.The Dashboard Bridge (
@skoor/dashboard-bridge): Widgets communicate with the SKOOR core platform exclusively through the official@skoor/dashboard-bridgelibrary. This bridge abstracts asynchronous communication (viapostMessageand Penpal) allowing widgets to:Fetch data dynamically using
dataQuerySelect(...)ordataSourceSelect(...).Read and update global dashboard filters (
getFilters(),setFilters(...)).Synchronize host styling, theme variables, font families, and content heights automatically via
setup().
Example package.json configuration for a custom widget (published under a customer scope, e.g., @customer-scope/custom-metric-widget):
{
  "name": "@customer-scope/custom-metric-widget",
  "version": "1.0.0",
  "main": "dist/index.html",
  "skoor": {
    "dataQueryPackage": "./data/data-queries.json"
  }
}
Development, MCP Server Integration & Publishing
To develop and publish custom widgets efficiently, you can connect your AI coding assistants directly to your SKOOR instance using the built-in Model Context Protocol (MCP) server.
Using the SKOOR MCP Server (Retrieve, Create, Update, Export)
The SKOOR MCP server allows external LLM clients (such as Cursor or Cline) to retrieve, create, edit, and export table and data query definitions directly from your SKOOR instance:
Retrieve: Query database schemas, table structures, and existing data query definitions to understand available data models.
Create: Automatically generate new data queries and structure widget definitions based on your exact specifications.
Update / Edit: Iteratively refine queries, adjust aggregations, or modify parameters directly inside your development environment with full schema validation.
Export: Export data query packages into JSON format using the MCP server export tool. Place widget-specific queries in a dedicated group, export that group, and the export will automatically include the required dependencies.
Configure your MCP client (e.g., in your project or global settings) using the following HTTP configuration template:
{
  "servers": {
    "skoor-mcp": {
      "type": "http",
      "url": "https://<your-skoor-instance>/skoor-webservice/mcp",
      "headers": {
        "Authorization": "Basic <your-base64-encoded-credentials>"
      }
    }
  },
  "inputs": []
}
Registry Setup & Publishing
Configure the Registry: Create a
.npmrcfile in your project root with the private SKOOR registry endpoint:registry=https://registry.skoor.com
Authenticate: Log in to the registry using the credentials provided by SKOOR:
npm login --registry=https://registry.skoor.com
Customer Scopes: Packages must always be published into your assigned customer scope (e.g.,
@customer-scope/my-widget).
Security, Network Restrictions & CSP
To protect enterprise data sovereignty and prevent unauthorized third-party data leakage, SKOOR enforces strict security policies on custom widgets:
Default Isolation: External network communication from inside a widget is strictly prohibited and blocked by default via a conservative Content Security Policy (CSP).
CSP Exceptions: If a widget explicitly requires communication with external endpoints (such as public APIs or third-party repositories), exceptions can be declared under the
skoor.cspsection inpackage.json:
{
  "skoor": {
    "csp": {
      "connect-src": [
        "https://api.external-service.com"
      ]
    }
  }
}
User Acknowledgment: When a widget requests additional network origins via its CSP configuration, the platform prompts administrators or users with a confirmation dialog to explicitly authorize outbound data access.
Lifecycle: Installation and Dashboard Deployment
Deploying and using a custom widget follows a straightforward administrative and operational lifecycle:
Publishing: Developers build and publish the versioned package to the private SKOOR Package Registry (
registry.skoor.com).Installation: Administrators navigate to SKOOR Settings, locate the Custom Widgets management section, and install the desired package from the private registry.
Dashboard Integration: Once installed, the custom widget becomes available in the WYSIWYG Dashboard Builder, where users can place it onto dashboards, configure its view parameters, and link it with global dashboard filters.